Properties panelThe Properties panel is new to Photoshop CS6 and replaces having an adjustments controls mode for the Adustments panel and also replaces the former Masks panel. The new Properties panel has two modes of operation. There is an ‘adjustment controls’ mode and also a Mask controls mode (which I describe below). The Properties panel will by default display the ‘adjustment controls’ mode when an adjustment layer is first created. As you click on any other adjustment layers in the Layers panel to select them, the Properties panel will update to show the controls and settings for that particular layer. Note that double-clicking a layer opens up the Properties panel if it is currently hidden. Properties panel in 'adjustments controls' modeYou can click on the Presets popup menu to quickly access one of the pre-supplied adjustment settings. Here, you might want to select each in turn, to see what each effect does, but without adding a new adjustment layer. Once you have configured a particular adjustment you can go to the Properties panel menu and choose Save Preset… to save as a custom adjustment setting. This will then appear appended to the Preset list as a custom setting. The middle section contains the main adjustment controls for whatever adjustment you are currently working on. At the bottom you have first, the adjustment layer clipping control button, which lets you determine whether a new adjustment is applied to all the layers that appear below the current adjustment layer, or are clipped just to the layer immediately below. Next to this is a button for switching between the previous state and the current edited state, where if you click and hold the mouse down (or hold down the \ key), you can see what the image looked like before the last series of image adjustments had been applied to it. Next to this is a Reset button for cancelling the most recent adjustments, but you can also use the undo command Command/Control-Z to toggle undoing and redoing the last adjustment and use the Command + Option/Control +Alt-Z shortcut to progressively undo a series of adjustment panel edits. Next to this is an eyeball icon for turning the adjustment layer visibility on or off and lastly a Delete button. When you click on this it will delete the current adjustment layer. The Properties panel will remain open though and simply say ‘No Properties’ at the top.
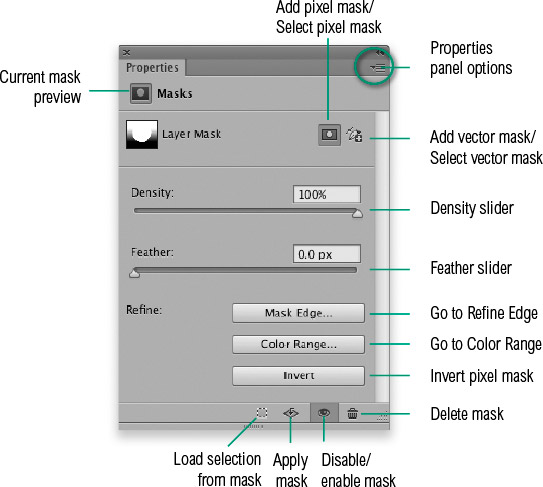
Figure 1 This shows the Properties panel with a Levels adjustment selected. Keeping the focus on the Properties panel Properties panel in 'masks controls' modeThe Masks panel was first introduced to Photoshop CS4 and could be used to refine the mask or masks associated with a layer. In Photoshop CS6 the Masks panel controls have now been amalgamated into the Properties panel (Figure 2). When an adjustment layer is selected, the Properties panel will have adjustments controls and masks controls modes. Which are shown will depend on whether you target the adjustment or the mask icon. In the case of a regular layer with a layer mask, the Properties panel only shows the masks controls (as can be seen in Figure 2 below). The pixel mask/vector mask selection buttons are at the top of the panel and these can also be used as ‘add mask’ buttons. The Properties panel won't display anything till you have added either a pixel or a vector mask. Therefore, you can add say, a vector mask to a layer currently masked using a pixel layer mask, or add a pixel mask to a layer currently masked using a vector mask. If you have both a pixel and vector mask added to a layer, you can tell which mode is active because it will say Pixel Mask or Vector mask at the top of the panel and the relevant mode button will be highlighted in the panel. Below this are the Density and Feather sliders for modifying the mask. The Density slider can be used to adjust the density of the mask and answers requests to have some kind of control over the mask contrast. A lot of layer masks will originate as black and white masks where the image adjustments or pixel layer contents are either at full opacity or hidden (the same is true of vector masks of course). The Density slider allows you to preserve the mask outline, but fade the contrast of the mask in a way that is completely re-editable. The Feather slider can be used to soften the mask edges up to a 1000 pixel radius. Beneath this though is the Mask Edge… button which will open the Refine Edge dialog, where you’ll find you have even greater control over the mask edges and softness. The Color Range… button will open the Color Range dialog, where you can make selections based on colors in the image you are editing. This means that you can use Color Range to make a selection within a mask selection and thereby modify the mask. The Invert button can be used to invert a pixel mask, but if you want to do the same thing with a vector mask you can do so by selecting a vector path outline and switching path modes. At the bottom of the panel there are buttons for loading a selection from the mask, applying a mask (which deletes the mask and applies it to the pixels) plus a delete button. |