
Horizontal type tool and vertical type tool
|
|||||||||||||||||||


Figure 1 The horizontal type tool and vertical type tool options bars.
Adding type
Photoshop type is stored in vector form in Photoshop, and as such is fully editable and scalable. OpenType fonts and their associated features are all supported by Photoshop and the text paragraph formatting, justification and hyphenation options found in the Paragraph panel work similar to the text engine found in Adobe InDesign. When you mouse down on the Font Family menu you will notice the font names have a WYSIWYG (what you see is what you get) menu listing (see Figure 2 below). This makes it easier for you to see how the font you are about to choose will actually look. The word ‘Sample’ appears alongside each font name, indicating the font appearance.
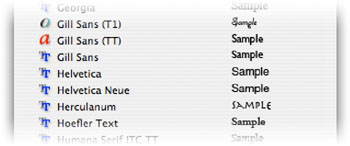 |
Figure 2 The WYSIWYG font name menu.
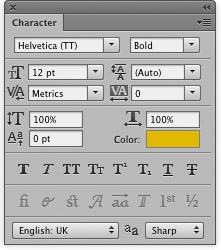
Paragraph text is created by clicking and dragging to create a paragraph box, into which you can add lines of wraparound text (where the text wraps within the text box). Or, you can click in the image window and begin typing (this will add a single line of text). Text in Photoshop can be edited at a per-character level, i.e. you can change individual character colors and font size etc. The fractional widths option in the Character panel options is normally left on as this will automatically calculate how to render the anti-aliased text using fractional widths of pixels. However, when setting small point sized type in Photoshop to be displayed on the screen, it is better to turn this option off. Photoshop will then round up the gap between individual characters to the nearest pixel distance so that small text rendered this way will be easier to read.
The anti-aliasing settings provide five levels: None, Sharp, Crisp, Strong and Smooth. With no antialiasing (None), the font edges are likely to appear jagged, while the Strong setting is suited to most graphics work. The Crisp setting is the least smooth and will probably prove useful when creating small point sized bitmapped text that is designed to appear on a web page. Photoshop notably features multilingual spell checking, which can be accessed from both the Edit menu and the Character panel. Photoshop can share its linguistic library with other Adobe applications and spelling additions can be shared between programs in the Creative Suite. The Tool presets panel is extremely useful if you wish to save your custom type and type attribute settings as a custom preset. So, for example, you can create a font preset which includes all the font attributes, including the font color and save this as a tool preset.
Accessing the Character and Paragraph panels
To open the associated Character and Paragaph panels, click on the panels button (to the right in the Options bar) to bring these panels to the front of the panel set. These provide fairly comprehensive typographical control. Because type is added as a separate layer in type form, it remains fully editable. To edit a type layer, highlight the type using the type tool, or double-click the Type Layer icon in the Layers panel. You can then change the fonts, apply different colors to all the text or single characters, or enter new text.
It is easier to make decisions about the type appearance if you can see the text without any highlighting. Choose View  Hide Extras
(Command+H/Control+H) to hide the inverted highlighting.
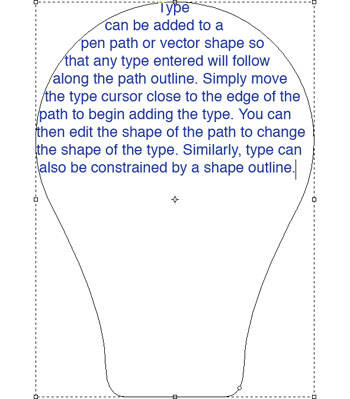
Type can be added to a pen path or vector shape so that any type entered will follow along the path outline. Simply move the type cursor close to the edge of the path to begin adding the type. You can then edit the shape of the path to change the shape of the type. Similarly, type can also be constrained by a shape outline by placing the cursor within an active path shape. Figure 3 shows examples of text applied inside a vector path outline as well as text made to flow along an open path.
 |
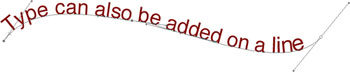 |
Figure 3 Type can be added inside a shape or be made to follow a pen path. When you add type to a path you can reposition it by selecting the path selection or direct selection tool from the tools panel. With either of these tools selected, place the cursor over the path so that the cursor changes to indicate that you can edit the text position, mouse-down and drag. As you do so, you can slide the text along a path outline and even drag it so that it flows along the underside of a path.
Adding layer styles and text warping
Layer styles/effects can be applied to both type layers and image layers. Layer styles automate the process of adding grouped layers to provide effects such as drop shadows. Layer styles now offer a phenomenal variety of text effects and you can also distort the text in a type layer by using the warp controls that are available from the Type options bar Warp Text menu (see Figure 4).
 |
|
 |
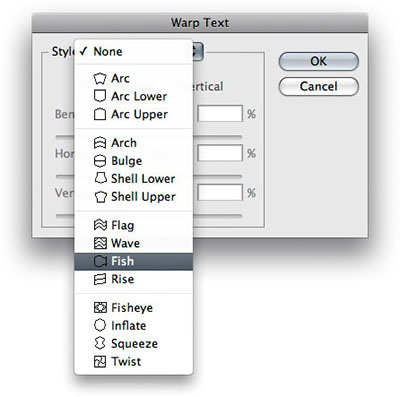 |
Figure 4 The Warp Text options are accessible from both the Options bar and the Layer Type menu. Select a type layer and open the Warp Text dialog. You can select a warp option from the pop-up menu and adjust the Bend and Distortion amount using the sliders below.
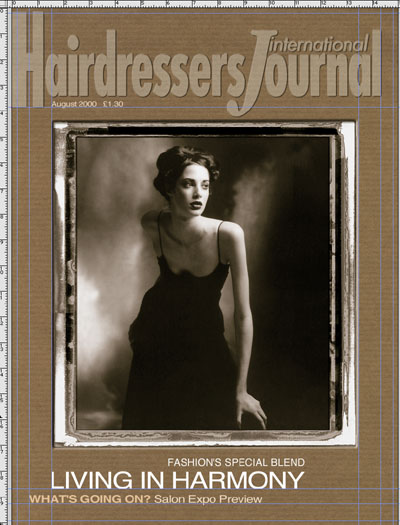
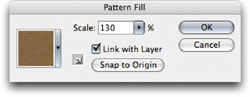
A magazine cover like the one shown below in Figure 5 was designed entirely within Photoshop. The masthead was a path outline that I copied from Illustrator and pasted into Photoshop. I then chose Edit Define Custom Shape, to add it to the Shape presets (once I have a saved shape preset I can select it at any time and add it as a new shape layer). I then added a Pattern Fill layer above the background, using a custom pattern, which was scaled up slightly. I then applied a couple of layer effects to the main image, to make the photograph appear as if it were recessed in a card mount frame. I added the text on separate layers, and was able to set different point sizes and change the color of the type line by line, as desired.
 |
|
  |
 |
 |
|
Figure 5 This shows how a magazine page layout was designed entirely in Photoshop.
Horizontal type mask tool and Vertical type mask tool 

The horizontal type mask and vertical type mask tools offer the same level of typographic control as the standard type tools. However, instead of adding a type layer they create a selection outline instead. If your goal is to create a type selection, then I suggest that the best method is to use the standard type tools first to do all your typographic editing and then simply Command/Control-click the type layer to convert the layer contents to an active selection. The horizontal type mask and vertical type mask Options bar views are shown below in Figure 6.
 |
 |
Figure 6 The horizontal type mask and vertical type mask tool Options bars.