
Slice tool and Slice select tool
|


 |
Figure 1 The slice tool Options bar.
 |
Figure 2 The slice select tool Options bar.
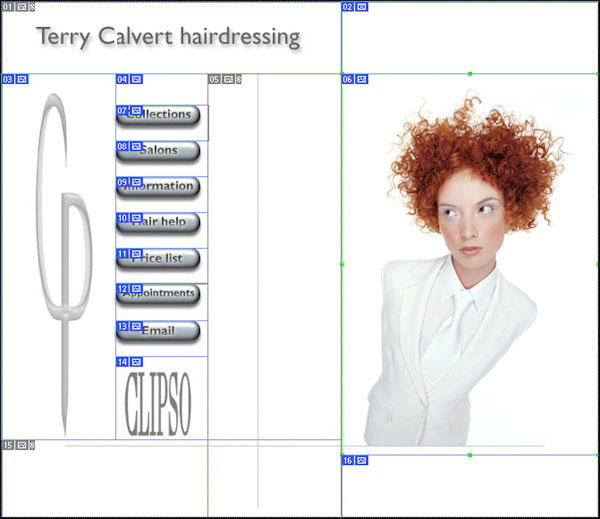 |
Figure 3 Images can be sliced up in Photoshop using the slice tool. You can then optimize individual slices via the Photoshop Save for Web Dialog (see Figure 4). You can also create slices based on the Photoshop layers by choosing Layer  New Layer Based Slice. This is really handy because it will mean that the slice sections will update in size whenever layer effects such as a drop shadow effect are added or adjusted.
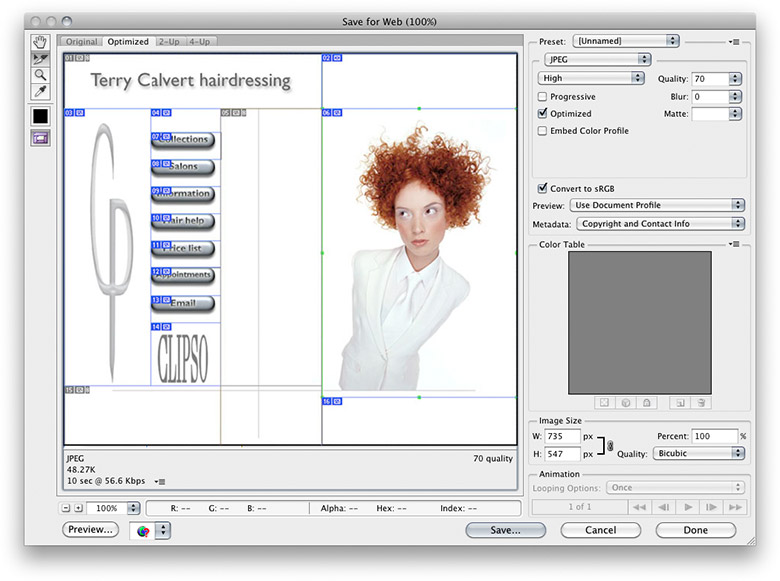 |
Figure 4 Here is how the above ‘sliced’ image would look when viewed in the Save For Web & Devices dialog. Note how you can select individual slices (such as the main image) and choose specific image optimization settings. Different compression or format options can be applied to individual slices such that areas where image detail matters most, less JPEG compression is applied.
About image slicing
You can use image slices in Photoshop to create and design dynamic web page layouts from a layered Photoshop image that will download efficiently and produce HTML output files that can be further edited in a program like Adobe GoLive or Dreamweaver. Slicing makes it easy to specify what type of content will appear in a slice and how the image content in a slice shall be optimized.
When you select the slice tool and drag you will notice the first slice (01) is assigned to the entire image. When you drag with the slice tool inside the document, you are creating what is known as a ‘user-slice’. As you add a new user-slice, ‘auto-slices’ will be automatically generated every time you add or edit a user-slice. User-slices can be created by dragging with the slice tool in this way, but they can also be based on the layer bounds (choose Layer New Layer Based Slice), or the guides in a Photoshop image by clicking on the Slices From Guides button in the slice tool Options bar. Note that when you create a user-slice based on a layer, the slice automatically adjusts to any subsequent changes that are made to the layer, such as when you add an outer glow layer or drop shadow effect.
 |
Figure 5 When guides are added to an image you can click on the Slices from Guides button in the slice tool options to create slices based on guides.
Modifying slices
There are several ways to modify the slices. With the slice select tool selected, go to the slice tool options panel and click on the Divide Slice button. This will open a dialog box shown in Figure 6, allowing you to divide an existing slice vertically or horizontally. This is useful where slice symmetry is vital.
 |
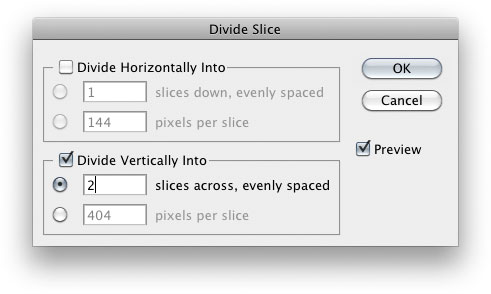 |
Figure 6 The slice select tool Divide Slice options.
You can modify a slice by selecting the slice select tool and clicking on the slice you wish to edit (all slices but the active slice will appear dimmed) and using  -click to select multiple slices. You can also use the slice select tool to move a slice or resize it by dragging on one of the corner handles. A solid line border indicates that it is a user-slice and a dotted line will indicate that it is an auto-slice. It is possible to promote auto-slices to become user-slices by clicking on the Promote button in the slice select tool options panel (see Figure 6). Doing this will prevent it from being altered whenever a regeneration takes place.
Slice content options
You can open the Slice Options dialog by clicking on the circled menu option in the slice select tool Options bar (Figure 7). The default behavior when slicing images is to create image content slices; however, you can create no-image slices that can have text or even solid color fills. The Background Color option will fill a no-image slice with a solid color or fill the transparent areas of an image content slice. No-image slices can also be created within the Save for Web & Devices dialog in Photoshop. A URL web link can be added in the Slice Options URL text box. These slice content modifications cannot be seen directly in the Photoshop document window, so you will only be able to preview these by looking at a page that has been exported from the Save for Web dialog, via a web browser or other web page editing program.
 |
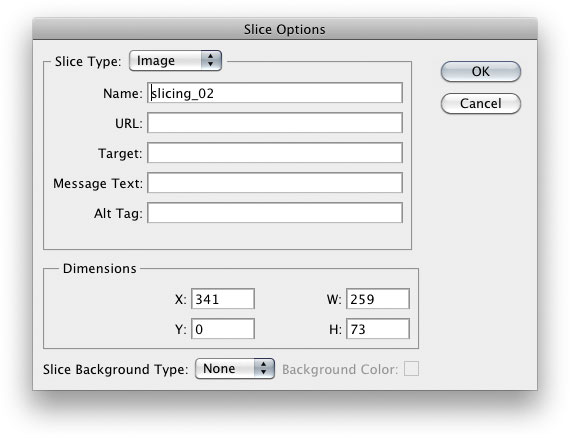 |
Figure 7 You can open the Slice options by clicking on the circled menu option in the slice select tool Options bar.