Rectangular marquee tool 
In Photoshop the usual editing conventions apply: pixels can be cut, copied and pasted just as you would when working with text in a word processing document and mistakes can be undone by using the Edit  Undo command or by selecting a previous history state via the History panel.
The Photoshop selection tools can mainly be used to define a specific area of the image that you wish to modify, or have copied. The use of the selection tools in Photoshop is therefore like highlighting text in a word processor program in preparation to do something with the selected content. In the case of Photoshop, you might want to make a selection to define a specific area of the image, so that when you apply an image adjustment or a fill, only the selected area will be modified. Alternatively, you might use a selection to define an area you wish to copy and paste, or define an area of an image that you want to copy across to another image document as a new layer. The rectangular maquee tool can be used to create rectangular or square selections and the Options bar for this tool is shown below in Figure 1.
Figure 1 The rectangular marquee tool Options bar.
The rectangular marquee tool in use
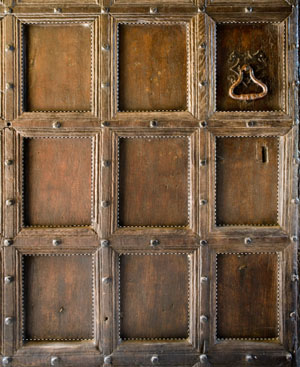
Figure 2 below, shows an example of the rectangular marquee tool in use.
Figure 2 In this example I used the rectangle marquee tool to marquee one of the inner panels and followed this by holding down the Shift key to select more panels with the rectangular marquee. I deleted the selected areas and placed the cut-out image as a layer above a seascape image.
The Options bar for the selection tools has four modes of operation for each of the selection tools: Normal; Add to Selection; Subtract from Selection; and Intersect Selection (see Figure 3 below).
Figure 3 The Options panel for the selection tools.
Modifier key behavior
If you hold down the Shift key when drawing a marquee selection this constrains the selection to a square or circle. If you hold down Option/Alt when drawing a marquee selection it will center the selection around the point where you clicked on the image. And if you Hold down the Shift+Option/Shit+Alt keys when drawing a marquee selection, this will constrain the selection to a square or circle and center the selection around the point where you first clicked. The Spacebar is also a modifier key, in that it allows you to reposition your selection midstream.
After you have created an initial selection, the modifier keys will behave differently. If you hold down the Shift key as you drag with the marquee or lasso tool, this will add to the selection (holding down the Shift key and clicking with the magic wand tool also adds to an existing magic wand selection). If you hold down the Option/Alt key as you drag with the marquee or lasso tool, this will subtract from the selection (holding down the Option/Alt key and clicking with the magic wand tool also subtracts from the existing selection). And the combination of holding down the Shift+Option/Shit+Alt keys together whilst dragging with a selection tool (or clicking with the magic wand) will create an intersection of the two selections (see Figure 4 below).
Other modifier key uses
The modifier keys can also be used to modify the options that are available in Photoshop. For example, if you hold down the Option/Alt key as you click on the marquee tool in the Tools panel you will notice how this cycles through the tools available in this group. And whenever you are in a Photoshop dialog box it is also worth exploring what happens to the dialog buttons when you hold down the Option/Alt key. You will often see the button names change to reveal more options.
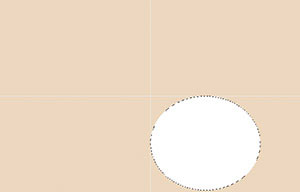
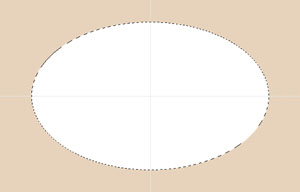
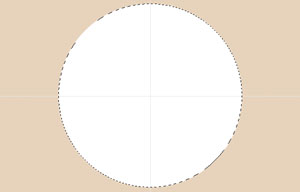
Figure 4 These composite screen shots show Quick Mask views of selections created by dragging out from the center with Shift held down (top), with the Option/Alt key held down (middle) and the Shift+Option/Shit+Alt keys (bottom).
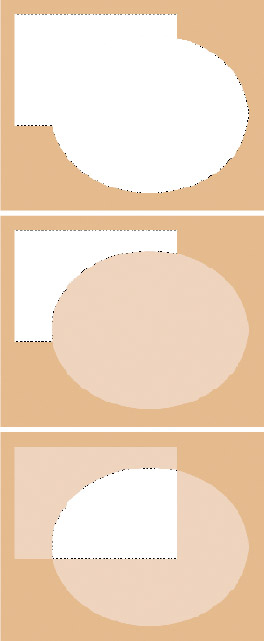
The composite screen shots in Figure 5 show Quick Mask views of selections modified after the initial selection stage. The top view shows an elliptical selection combined with a rectangular selection with the Shift key held down, adding to a selection. The middle view shows an elliptical selection combined with a rectangular selection with the Option/Alt key held down, which will subtract from the original selection. The bottom view shows an elliptical selection combined with a rectangular selection with the Shift+Option/Shit+Alt keys held down, which will result in an intersected selection being made.
Figure 5 This shows the outcome of using modifier keys to modify an existing selection.
Elliptical marquee tool 
In Photoshop the usual editing conventions apply: pixels can be cut, copied and pasted just as you would when working with text in a word processing document and mistakes can be undone by using the Edit Undo command or by selecting a previous history state via the History panel.
The Photoshop selection tools can mainly be used to define a specific area of the image that you wish to modify, or have copied. The use of the selection tools in Photoshop is therefore like highlighting text in a word processor program in preparation to doing something with the selected content. In the case of Photoshop, you might want to make a selection to define a specific area of the image, so that when you apply an image adjustment or a fill, only the selected area will be modified. Alternatively, you might use a selection to define an area you wish to copy and paste, or define an area of an image that you want to copy across to another image document as a new layer. Figure 6 below shows the elliptical tool Options bar.
Figure 6 The elliptical marquee tool Options bar.
The elliptical marquee tool in use
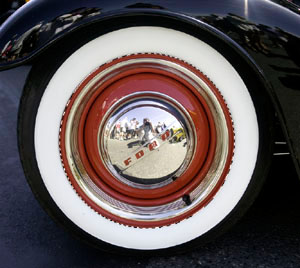
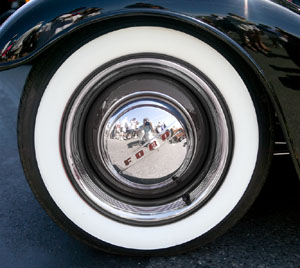
Figure 7 below, shows an example of how the elliptical marquee tool can be used to select a wheel on a car.
Figure 7 A selection can be used to define a specific area of an image that you wish to work on. In this example, I made an elliptical marquee selection of the inner tire wheel and followed this with an image adjustment to desaturate the red color.
The options bar for the selection tools has four modes of operation for each of the selection tools: Normal; Add to Selection; Subtract from Selection; and Intersect Selection. You can also achieve these same operating modes by using the modifier keys highlighted in Figure 8.
Figure 8 The Options bar for the selection tools has four modes of operation for each of the selection tools: Normal; Add to Selection; Subtract from Selection; and Intersect Selection. You can also achieve these same operating modes by using the modifier keys (as described below).
Modifier key behavior
If you hold down the Shift key when drawing a marquee selection this constrains the selection to a square or circle. If you hold down Option/Alt when drawing a marquee selection it will center the selection around the point where you clicked on the image. And if you Hold down the Shift+Option/Shit+Alt keys when drawing a marquee selection, this will constrain the selection to a square or circle and center the selection around the point where you first clicked. The Spacebar is also a modifier key, in that it allows you to reposition your selection midstream.
After you have created an initial selection, the modifier keys will behave differently. If you hold down the Shift key as you drag with the marquee or lasso tool, this will add to the selection (holding down the Shift key and clicking with the magic wand tool also adds to an existing magic wand selection). If you hold down the Option/Alt key as you drag with the marquee or lasso tool, this will subtract from the selection (holding down the Option/Alt key and clicking with the magic wand tool also subtracts from the existing selection). And the combination of holding down the Shift+Option/Shit+Alt keys together whilst dragging with a selection tool (or clicking with the magic wand) will create an intersection of the two selections (see Figure 9 below).
Other modifier key uses
The modifier keys can also be used to modify the options that are available in Photoshop. For example, if you hold down the Option/Alt key as you click on the marquee tool in the Tools panel you will notice how this cycles through the tools available in this group. And whenever you are in a Photoshop dialog box it is also worth exploring what happens to the dialog buttons when you hold down the Option/Alt key. You will often see the button names change to reveal more options. For example, if you have an open dialog box and hold down the Option/Alt key, the Cancel button will often become a Reset button, which will allow the dialog box to remain open, allow you to reset the dialog box settings and enter new settings values.
Figure 9 These composite screen shots show Quick Mask views of selections created by dragging out from the center with Shift held down (top), with the Option/Alt key held down (middle) and the Shift+Option/Shit+Alt keys (bottom).
The composite screen shots in Figure 10 show Quick Mask views of selections modified after the initial selection stage. The top view shows an elliptical selection combined with a rectangular selection with the Shift key held down, adding to a selection. The middle view shows an elliptical selection combined with a rectangular selection with the Option/Alt key held down, which will subtract from the original selection. The bottom view shows an elliptical selection combined with a rectangular selection with the Shift+Option/Shit+Alt keys held down, which will result in an intersected selection being made.
Figure 10 This shows the outcome of using modifier keys to modify an existing selection.
Single pixel selection tool 

In Photoshop the usual editing conventions apply: pixels can be cut, copied and pasted just as you would when working with text in a word processing document and mistakes can be undone by using the Edit Undo command or by selecting a previous history state via the History panel.
The Photoshop selection tools can mainly be used to define a specific area of the image that you wish to modify, or have copied. The use of the selection tools in Photoshop is therefore like highlighting text in a word processor program in preparation to do something with the selected content. In the case of Photoshop, you might want to make a selection to define a specific area of the image, so that when you apply an image adjustment or a fill, only the selected area will be modified. Alternatively, you might use a selection to define an area you wish to copy and paste, or define an area of an image that you want to copy across to another image document as a new layer.
The marquee selection tool options include the single row/single column selection tools. The single column tools can be used to select a single row or column of pixels: either a vertical or a horizontal selection. Figure 11 below shows the single row marquee selection tool options bar.
Figure 11 The single row marquee tool Options bar.
The Options bar for the selection tools has four modes of operation for each of the selection tools: Normal; Add to Selection; Subtract from Selection; and Intersect Selection. You can also achieve these same operating modes by using the modifier keys highlighted in Figure 12.
Figure 12 The Options bar for the selection tools.