Lasso tool 
The lasso tool behavior is more or less identical to that of the marquee selection tools and the same modifier key rules apply. To use the standard, freehand lasso tool, just drag around the area to be selected holding down the mouse as you draw. When you release the mouse, the last point of the lasso selection drawn will join up with the starting point to form a complete selection.
As with the marquee selection tools, you can hold down the Shift key and then drag with the lasso or polygon lasso tool to add to an existing selection. Or, you can hold down the Option/Alt key to subtract from an existing selection, or hold down the Shift+Option/Shift+Alt keys to intersect with an existing selection. Note that if you hold down the Option/Alt key, the freehand lasso tool temporarily switches to a polygon lasso tool mode. Figure 1 below shows the freehand lasso tool Options bar.
Figure 1 The lasso tool Options bar.
Polygon lasso tool 
When the polygon lasso tool is selected you can click to start the selection, release the mouse and position the cursor to draw a straight line, click to draw another line and so on. To complete a polygon lasso tool selection, position the cursor directly above the starting point (a small circle icon appears next to the cursor) and click on the start point. Note that with the polygon lasso tool you don’t have to keep the mouse pressed down as is necessary with the lasso tool. If you want to temporarily revert to freehand lasso mode operation, hold down the Option/Alt key and drag with the mouse. Release the Option/Alt key and the tool will revert to polygon mode again. As with the marquee selection tools, you can hold down the Shift key and then drag with the lasso or polygon lasso tool to add to an existing selection. Or you can hold down the Option/Alt key to subtract from an existing selection or hold down the Shift+Option/Shift+Alt keys to intersect with an existing selection. Figure 2 below shows the polygon lasso tool options bar.
 |
Figure 2 The polygon lasso tool Options bar.
Magnetic lasso tool 
The magnetic lasso tool can be used to create semi-automatic outline selections. The sensing area width can be set in the Options bar and when you move the tool along the edges in a picture, the magnetic lasso is able to sense where that edge is and create a selection that follows the edge. You continue to brush along the edges until the outline is complete and then close the selection in the usual manner by clicking on the start point. Figure 3 below shows the magnetic lasso tool Options bar.
Figure 3 The magnetic lasso tool Options bar.
The magnetic lasso is bound to appeal to beginners and anyone who has problems learning to draw a lasso selection with the lasso tool. I reckon on this being quite a powerful Photoshop feature and should not be dismissed lightly as an ‘idiot’s lasso tool’. When this tool is used in conjunction with a graphics tablet and the ‘Use tablet pressure to change pen width’ option is checked in the magnetic lasso tool Options bar, you can broaden or narrow the area of focus by varying the stylus pressure. But without such a tablet, you can also use the square bracket keys  and
and  on the keyboard to determine the size of the tool focus area.
In operation, the magnetic lasso draws a pseudo path, laying down fastening points along the way. The Frequency setting in the Options bar can be used to determine how far apart these points are placed, while the Edge Contrast can be used to specify the minimum contrast an edge has to have before the tool is attracted to that edge. As you brush along an edge, an outline will follow the edge of greatest contrast within the brush width area and will stick to an edge like a magnet.
To reverse a magnetic outline, drag back over the outline that has been drawn so far. Where you meet a fastening point, you can either proceed from that position or hit the delete key to reverse your tracks even further to the fastening point before that and so on… You can also manually add fastening points by clicking with the mouse.
When using the magnetic lasso, you can just click, drag and only click again when you wish to lay down a fastening point. To complete a selection, click on the start point. Or, you can double-click or hit the Enter key to close a selection with a line that will be determined by the magnetic tool. Photoshop will intelligently follow the line you are currently on and close the loop wherever there is good edge contrast for the tool to follow. Use Option/Alt double-click to close the path with a straight line segment.
As you define an outline (with the mouse held down), if you hold down with the Option/Alt key, this will change the magnetic lasso tool behavior to that of a regular lasso tool, allowing you to manually follow the outline of an edge. Note that if you hold down Option/Alt when the mouse is not held down, this will change the magnetic lasso tool behavior to the polygon lasso mode (or freeform pen tool if using the magnetic pen tool – see the magnetic pen tool page).
An example of the magnetic lasso tool in use
1 Where there is a high contrast edge, the magnetic lasso has little problem following the suggested path as I drag around the edge of the head. Fastening points are automatically added along the way. The center cross-hair hotspot will help guide you when locating the edge.
2 The magnetic lasso does not add another point until it senses a continuation of the edge. The magnetic lasso lays down a path like a magnet sticking to an edge. To scroll the screen as you work, hold down the Spacebar – this temporarily accesses the hand tool without disturbing the operational flow of the selection tool.
3 When using a graphic tablet input device, the size of the magic lasso selection area can be enlarged by lessening the pressure. This makes drawing an outline much quicker. For precise edge definition, add more pressure to narrow down the tool’s field of view.
4 To undo points, reverse the path of the tool and hit the Delete key to erase previous points (there are no limits to this type of undo). To complete the selection, double-click or hit the Enter key. The end points will join up and if there is a gap, attempt to complete the image outline.
Making it easier to define an edge with the magnetic lasso
1 Photoshop’s magnetic lasso tool operates by analyzing the composite image to determine where the edges of an object lie. The difficulty here is that although the edges may appear clear to us, Photoshop is not always able to determine these so easily.
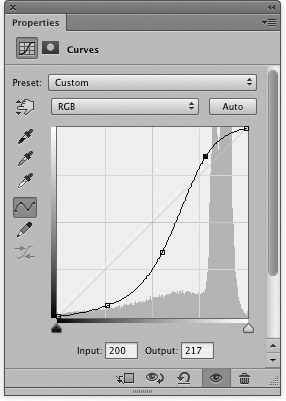
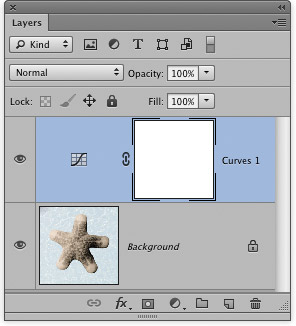
2 One answer is to add a temporary, contrast increasing adjustment layer to the image. In this example, I added a Curves adjustment layer and created an ‘S’ shaped curve. The outline then appeared much clearer and the magnetic lasso had no trouble seeing the edges. Once the magnetic selection had been completed I could then discard the Curves adjustment layer.
Photograph: Peter Hince.