
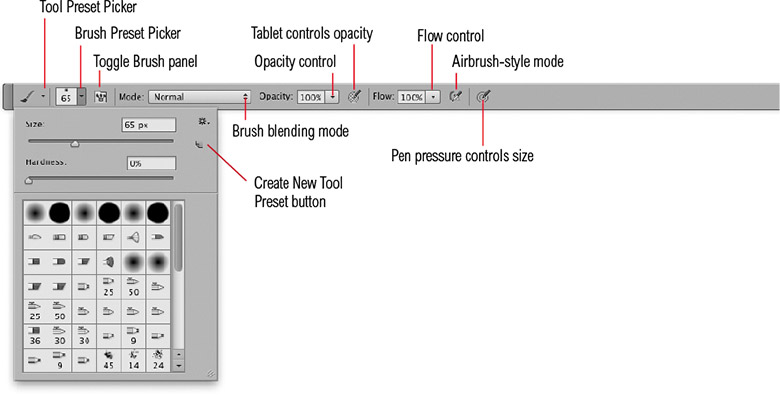
Brush tool
|

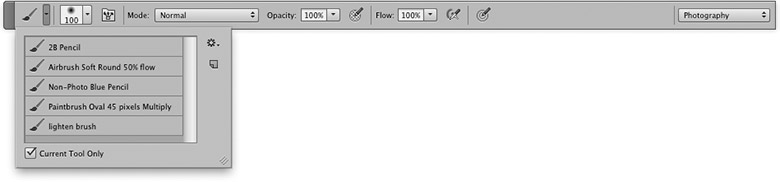 |
Figure 2 The brush tool Options bar showing the Brush tool Preset Picker list.
On-the-fly brush changes
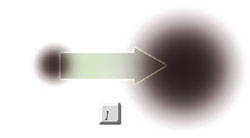
Instead of visiting the Brush Preset Picker every time you want to adjust the size or hardness of a brush, you will find it is much quicker to use the square bracket keys, as described in Figures 3 and 4 to make on-the-fly changes to the brush size and hardness.
 |
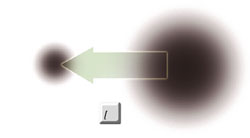 |
Figure 3 There is no need to visit the Brush or Tool presets each time you want to change the size of a brush. Use the right square bracket key  to make a brush bigger and the left square bracket key
  to make it smaller.
 |
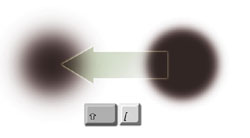 |
Figure 4 Combine the square bracket keys with the Shift key on your keyboard and you can use the Shift + to make a brush edge harder and Shift + to make a brush edge softer.
If you Control/right mouse-click in the image you are working on, this will open up the Brush Preset menu, directly next to the cursor (se Figure 5). Click on the brush preset you wish to select and once you start painting, the Brush Preset menu will close (or alternatively, use the Escape key). Note that if you are painting with a Wacom stylus you can close this pop-up dialog by lifting the stylus off the tablet and squeezing the double-click button. If you Control+Shift-click (Mac) or right mouse+Shift-click (PC) in the image while using a brush tool, this opens the blending mode list. These blend modes are like rules which govern how the painting pixels are applied to the pixels in the image below. For example, if you paint using the Color mode, you can apply color only to an image. And, if you click on the Edit Brush... menu item this will once more reveal the Brush Preset list.
 |
 |
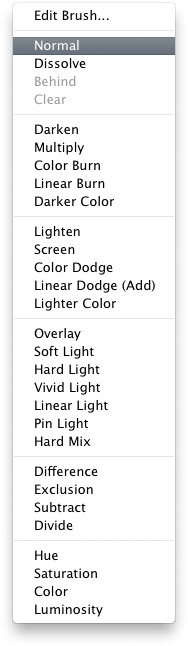 |
Figure 5 When using any of the paint tools in Photoshop, a Control/right mouse-click will open the Brush Preset menu (center), while a Control+Shift–click (Mac) or right mouse+Shift–click (PC) will reveal the brush blending modes list (right).
Providing the graphics card in your computer is OpenGL enabled and you have the 'Use Graphics Processor' option enabled in the Performance preferences, Photoshop offers you on-screen brush adjustments and a HUD (heads up display) color picker. If you hold down the Control+Option keys (Mac), or the Alt key and right-click (PC), dragging to the left makes the brush size smaller and dragging to the right, larger. Also, if you drag upwards this makes a round brush shape softer, while dragging downwards makes a round brush shape harder. Note here how the brush hardness is represented with a quick mask type overlay. If you hold down the Command+Option+Control keys (Mac), or the Alt+Shift keys and right-click (PC), this opens the Heads up display color picker where for as long as you have the mouse held down you can move the cursor over the outer hue wheel or hue strip to select a desired hue color and then inside the brightness/saturation square to select the desired saturation and luminosity. The point where you release the mouse selects the new foreground color. Figure 6 shows an example of how the paint tool cursor looks for both the on-screen brush size/hardness adjustments and the Hue Wheel HUD color picker displays.
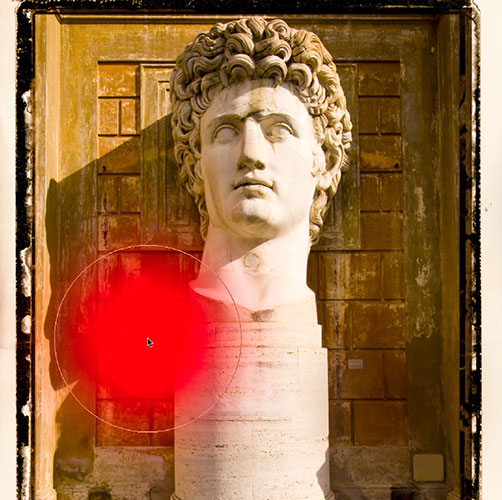
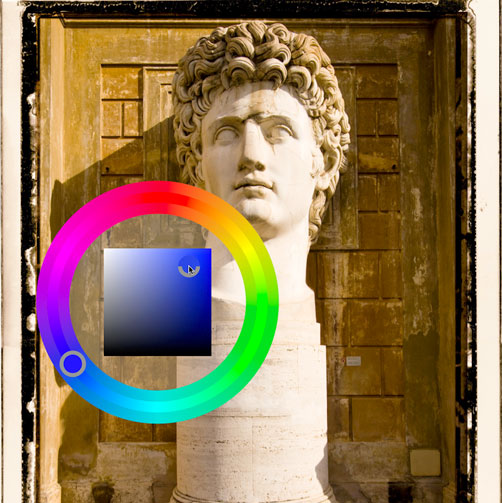
Figure 6 You can dynamically adjust the brush size and hardness of the painting tool cursors on-screen, or open the heads up display color picker using the modifier keys described in the main text (providing the 'Use Graphics Processor' option is enabled in the Performance preferences). See chapter 2 for more information on how to select alternative HUD display options.