Mixer brush tool 
The mixer brush tool allows you to paint more realistically in Photoshop. With the mixer brush you can mix colors together as you paint, picking up color samples from the image you are painting on and set the rate at which the brush picks up paint from the canvas and the rate at which the paint dries out. The mixer brush can be used with the new bristle tips or with the traditional Photoshop brush tips (now referred to as static tips) to produce natural-looking paint strokes. The combination of the mixer brush and bristle tip brushes provide a whole new level of sophistication to the Photoshop paint engine. The only downside is that the user interface has had to become even more complicated. The brush controls are split between the Brush panel, the Brush Presets panel, the Options bar and the new Bristle preview. It’s not particularly easy to pick up a brush and play with it unless you have studied all these brush options in detail and can understand how the user interface is meant to work. Fortunately, the Tool Presets panel can help here and the easiest way to get started is to select one or two of the new brush presets and experiment painting with these brush settings to gain a better understanding of what the new brush settings can do. In the meantime, let’s take a look at the Options bar settings for the mixer brush that’s shown below in Figure 1.
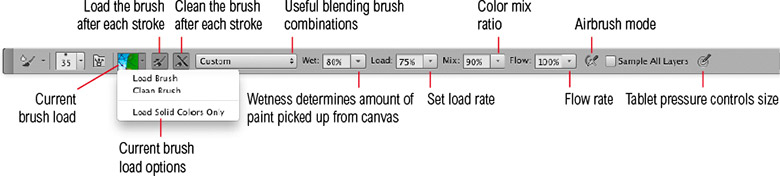
Figure 1 The mixer brush tool options.
The mixer brush tool has two wells: a reservoir and a pickup. The reservoir well color is defined by the current foreground color swatch in the tools panel or by Option/Alt-clicking in the image canvas area. This is the color you see displayed in the Load preview swatch. The pickup well is one that has paint flowing into it and continuously mixes the colors of where you paint with the color that’s contained in the reservoir well. Clicking on ‘Clean brush’ from the ‘Current brush load’ options immediately cleans the brush and clears the current color, while clicking ‘Load brush’ fills with the current foreground color again. The ‘Load brush after each stroke’ button does what it says, it tells the mixer brush to keep refilling the pickup well with color and therefore the pickup well becomes progressively contaminated with the colors that are sampled as you paint. The ‘Clean brush after each stroke’ button empties the reservoir well after each stroke and effectively allows you to paint from the pickup well only (Figure 2 shows an example of how the wells are displayed in the Options bar).

Figure 2 The Load swatch displays the main reservoir well color in the outer area and the pickup well color in the center. Clicking on the mixer brush current brush load swatch launches the Photoshop color picker.
The Wet option controls how much paint gets picked up from the image canvas. Basically, when the wetness is set to zero the mixer brush behaves more like a normal brush and deposits opaque color. As the wetness is increased so is the streaking of the brush strokes. The Load option is a dry-out control. This determines how much paint gets loaded into the main reservoir well. With low Load rate settings you’ll get shorter brush strokes where the paint dries out quickly and as the load rate setting is increased you get longer brush strokes.
Mix and Flow
The Mix control determines how much of the color picked up from the canvas that goes into the pickup well is mixed with the color stored in the main reservoir well. A high Mix ratio means more ink flows from the pickup to the reservoir well, while the Flow control determines how fast the paint flows as you paint. With a high Flow setting, more paint is applied as you paint. If you combine this with a low Load rate setting you’ll notice how at a high flow setting the paint flows out quickly and results in shorter paint strokes. At a lower Flow rate you’ll notice longer (but less opaque) brush strokes.
