Smudge tool 
The smudge tool is an interesting painting tool to work with because it can be used to smear pixels the same way as one might mix paints together. The smudge tool basically smears the pixels (rather than distort them the way the Liquify filter does) and for best results I recommend that you use a pressure sensitive graphics tablet so as to have precise control over your smudge tool painting. The smudge tool selects the color of the pixels where you first click and smears the pixels in whichever direction you drag the brush, while the Finger Painting option uses the current foreground color for the start of the smudge.
The smudge tool Options bar is shown in Figure 1 below. The Sample All Layers option is useful if you wish to carry out work with the smudge tool on a new empty layer, sampling the pixels from all currently visible layers. For example, you can create a new empty layer at the top of the layer stack and if the Sample All Layers option checked, you can then use the smudge tool on the empty new layer to achieve the effect you are after but without degrading the image data that is on the layers below.
In Figure 2, I have shown a before and after example of the smudge tool being applied as a stroke along a path.
Figure 1 The smudge tool Options bar.
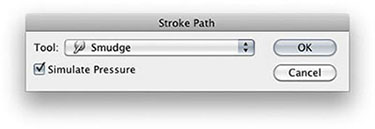
Figure 2 One way to use the smudge tool effectively is to stroke a path. The upper picture shows a screen shot of an image in which I had drawn a series of open pen paths, using the pen tool. I then selected a large brush size for the smudge tool and went to the Paths panel fly-out menu and selected Stroke Path… The Stroke Path dialog lets you select the tool to stroke with. Here, I selected the smudge tool from the list and clicked OK. This step applied the smudge tool to each of the paths, producing the finished result shown here.