Pen tool 
Photoshop provides a suite of vector path drawing tools that work in the same way as the pen path tools found in Adobe Illustrator and other programs that enable you to draw vector paths. If you are approaching Photoshop for the first time and have never any experience using vector path drawing tools, then the Photoshop path tools will require some getting used to.
When you should use vector path tools
There are many ways that you can create a selection in Photoshop. You can use the marquee tool, the magic wand tool, or you can make a Color Range selection, the list goes on… When you are faced with a situation where you need to define an outline in an image you need to weigh up which selection technique is the most appropriate to use. Any of the above methods might work, but where an outline is a little more complicated and can’t be selected so easily with a marquee tool or the magic wand, you might be tempted to use the freehand or magnetic lasso. But in all honesty, in the time it takes to define an outline with one of the lasso tools, you can often do a much better job by drawing a pen path instead. Now I am not going to pretend that it is easy to master the art of drawing pen paths, because it is not. But the ability to master the pen path is a skill that is definitely worth learning. In the long run you will find it is much easier using the pen tool to draw a pen path that defines the outline of an object (especially when you are trying to make a selection of an object that has been photographed against a busy background). You can then convert the pen path into a selection to be used the same way as you would with any other selection. For detailed instructions on drawing paths and working with the pen tool, refer to Chapter 9 on layers, selections and masking.
 |
Figure 1 The pen tool Options bar, showing the optional Rubber band mode.
The pen tool in use
The pen tool group includes the main pen tool, a freeform pen tool (which in essence is not much better than the lasso or magnetic lasso tools) and modifier tools with which to add, delete or modify path points. It is worth pointing out here that as long as the Auto Add/Delete box is checked in the pen tool Options bar (see Figure 1), the only tool you really need to access is the pen tool. Clicking on a path segment will auto add a new anchor point and clicking on an existing point will auto delete it. The Option/Alt key can be used to temporarily convert the pen tool to the convert point tool, the Command/Control key can be used to temporarily convert the pen tool to the direct selection tool. And the Command+ Option/Control+Alt keys can also be used to switch the pen tool to the path selection tool.
Creating a path
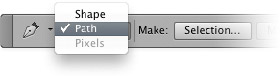
A work path can be created in Photoshop using the pen tool and there are two main ways of making a path (these options are highlighted in Figure 2 below). In the default Paths mode a ‘work path’ is created and the subsequent work path (whether it is closed or not) can then be converted to a foreground fill, stroke or a selection by dragging the path down to the appropriate button at the bottom of the Paths panel. In Shape mode you can create a filled object defined by the path that is filled with the current foreground color. An active, ‘current’ path can also be converted into a vector mask which will mask the contents of a layer using the path.
Figure 2 This shows a close-up view of the pen tool Options bar, where the Path mode is the default setting in Photoshop.
Guidelines for drawing pen paths
We shall start with the task of following the simple contours illustrated in Figure 3 (you will find a copy of this image in a layered Photoshop format on the website). This Photoshop file contains saved path outlines of each of the shapes. The background layer contains the basic image and above it there is another layer of the same image but with the pen path outlines and all the points and handles showing. Make this layer visible and fade the opacity if necessary so that you can follow the handle positions when trying to match drawing the path yourself.
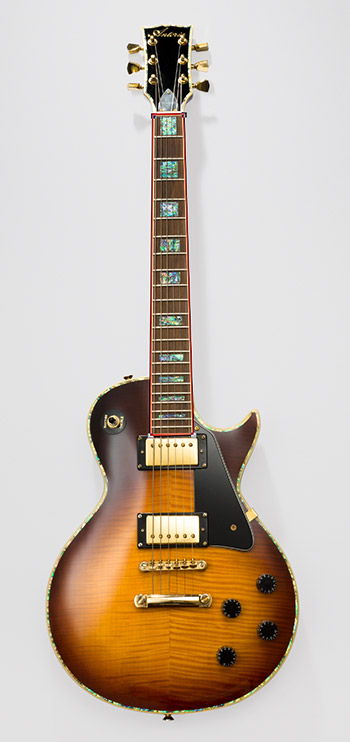

Figure 3 The path tutorial file of the guitar can be found on the website. On the left you can see the guitar neck selected for learning how to add basic straight line segments. On the right is a more compex challenge in which you can learn how to draqw curved segments and create corner points.
To help you understand how to create pen paths we shall start with the task of following the simple contours of the guitar illustrated in Figure 3. You will find a copy of this image as a layered Photoshop file on the website. This image contains a saved path outline of the guitar at a 200% view. The underlying image is therefore at 200% it’s normal size, so if you open this at a 100% view, you are effectively able to work on this demo image at a 200% magnification. The Background layer contains the Figure 3 image and above it there is another layer of the same image but with the pen path outlines and all the points and handles showing. I suggest you make this layer visible and fade the opacity as necessary. This will then help you to follow the handle positions when trying to match the path outlines. Let’s begin by making an outline of the guitar fretboard (the example on the left in Figure 3). If you have learnt how to draw with the polygon lasso tool, you will have no problem drawing this path outline. Click on the corner points one after another until you reach the point where you started. As you approach this point you will notice a small circle appears next to the cursor, which indicates you can now click to close the path. Actually, this is easier than drawing with the polygon lasso because you can zoom in if required and precisely reposition each and every point. To do this, hold down the Command/Control key to temporarily switch the pen tool to the direct selection tool and drag a point to realign it precisely. After closing the path, hit Command + Enter/Control + Enter to convert the path to a selection, or click Enter on its own to deselect the path.
Now try to follow the guitar body shape (the example on the right in Figure 3). This will allow you to concentrate on the art of drawing curved segments. Note that the beginning of any curved segment starts by you dragging the handle outward in the direction of the intended curve. (To understand the reasoning behind this, imagine you are trying to define a circle by following the imagined edges of a square box that contains the circle). To continue a curved segment, click and hold the mouse down while you drag to complete the shape of the end of the previous curve segment (and predict the initial curve angle of the next segment). This is assuming that the next curve will be a smooth continuation of the last. If there happens to be a sharp change in direction for the outline you are trying to follow you will need to add a corner point. You can convert a curved anchor point to a corner point by holding down the Option/Alt key and clicking on it. Click to place another point and this will now create a straight line segment between these two points. Now, if you hold down the Command/Control key you can again temporarily access the direct selection tool and reposition the points. When you click on a point or a segment with this tool the handles are displayed and you can use the direct selection tool to adjust these and refine the curve shape.
If you want to try defining the entire guitar, including the headstock you can practice making further curved segments and adding corner points (such as around the tuning pegs). These should be placed whenever you intend the next segment to break with the angle of the previous segment – hold down the Option/Alt key and drag to define the predictor handle for the next curve segment.
Rubber band mode
One way to make the learning process somewhat easier is to switch on the Rubber Band option which is hidden away in the pen tool Options bar (see Figure 1 at the top of this page). In Rubber Band mode, you will see the segments you are drawing take shape as you move the mouse cursor, and not just when you mouse down again to define the next path point. As I say, this mode of operation can make path drawing easier to learn, but for some people it can become rather tiresome to use after you have got the basic hang of how to follow a complex outline using the various pen tools.
When you should use vector path tools
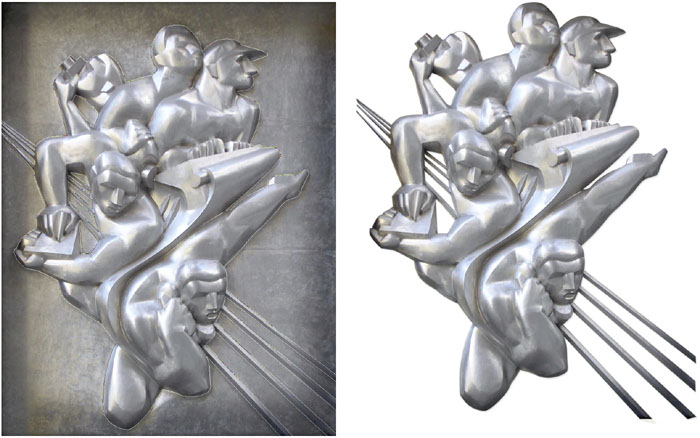
If you need to isolate an object or create a cut-out like the one shown below in Figure 4, the only way to do so is to use the pen and pen modifier tools to draw a path outline. You see, with a photograph like this, there is very little color differentiation between the object and the background, and it would be very difficult for an auto masking tool to accurately predict the edges in this image. I timed myself and it took me between 8-9 minutes to draw the path outline that was used to create the cut-out shown on the right.
Figure 4 This shows an example of an image where it is easier and quicker to use the pen tool to draw a path outline of the figures in this sculpture.
Freeform Pen tool 
The freeform pen tool operates more or less exactly like the lasso tool. The main difference is that the freeform pen tool automatically evens out the rough edges as you draw an outline in order to produce a pen path that uses as few anchor points as possible. The freeform pen tool Options bar is shown in Figure 5 below.
Figure 5 The freeform pen tool Options bar.
Magnetic pen tool mode
The freehand pen tool has a magnetic mode. When this is checked, the pen tool behaves just like the magnetic lasso, except that the path points can be saved as a path instead of being converted directly to a selection.
Add anchor tool 
When the add anchor point tool is selected you can use it to click on a path segment to add a new anchor point to a path. But the thing is, if you have the normal pen tool selected (with the Auto Add/Delete option selected in the pen tool Options bar) and hover over a pen path segment, it will automatically convert to the add anchor point tool mode. So there is effectively no need to bother with selecting the add anchor point tool. You can access the add anchor point tool without having to switch tools. The add anchor point tool Options bar is shown below in Figure 6.
Figure 6 The add anchor point tool Options bar. Note that there are no options here for the add anchor point tool.
Delete anchor point tool 
When the delete anchor point tool is selected you can use it to click on an existing anchor point to delete it. But the thing is, if you have the normal pen tool selected (with the Auto Add/Delete option selected in the pen tool Options bar) and hover over an anchor point, it will automatically convert to the delete anchor point tool mode. So there is effectively no need to bother with selecting the delete anchor point tool. You can access the delete anchor point tool without having to switch tools. The delete anchor point tool Options bar is shown below in Figure 7.
Figure 7 The delete anchor point tool Options bar. Note that there are no options here for the delete anchor point tool.
Convert point tool 
When you draw a pen path, the pen tool will lay down what are known as smooth points. As you add more points, the pen tool will draw a path where the path segments flow smoothly on from the path anchor point you have just added. When you make a smooth anchor point active you will notice how the path predictor handles either side of the anchor point are linked. As you adjust a path predictor handle, it will affect the shape of the path segment either side of the selected anchor point. The convert point tool allows you to convert an anchor point from a corner point to a smooth point and vice versa. The convert point tool Options bar is shown below in Figure 8.
Figure 8 The convert point tool Options bar. Note there are no options here for the convert point tool.
Corner points allow you to break the continuity of a pair of path segments and continue the path line in a completely different direction. When you convert a smooth point to become a corner point, the path predictor handles lose their linking and you can edit both handles individually. So when the convert point tool is selected, you can click on a smooth anchor point to convert it to become a corner point and you can click and drag on a corner point to convert it to become a smooth point. But you don’t necessarily need to select the convert point tool at all. If the pen tool is selected you can hold down the Option/Alt key to convert the pen tool to the convert point tool.
All told, when you take into account the fact that the Command/Control key can be used to switch the pen tool to the direct selection tool and the combination of the Command+Option/Control+Alt keys can be used to switch the pen tool to the path selection tool, the pen tool and freeform pen tool are probably the only pen path tools that you really need to select from the tools panel when drawing and editing a pen path.